
Scroll down to the bottom of the page for a video demo of teaching long and low on the ground.
Stage 2 of the Creating Relaxation series starts teaching long and low on the ground. Here we will be applying the cue established in Phase 1 and expanding on this base.
Prerequisites for Long and Low
- mastery of the exercise outlined in Creating Relaxation Stage 1: Releasing the Jaw
Some horses will take longer than others to move from stage 1 to stage 2. Have patience. Consistency should be your goal, not speeding through all the steps as fast as possible. If you don’t build the proper foundation, holes will show up later on down the road, and your horse’s progress will really suffer for it.
Required Materials
- bridle with snaffle bit of your choice (D-ring, o-ring, eggbutt, etc.)
- the reins you are going to ride with
- dressage whip (optional)
Training Exercise: Long and Low
Overview
This exercise is the second step to achieving long and low under saddle. Here we are taking the cue we established in Stage 1 and using it while the horse is in motion to begin developing that long and low frame.
Using the Proper Equipment
Stage 2 is done in the same standard snaffle bridle as Stage 1. Any basic ring snaffle will do. Again, the key here is ring snaffle. Leverage bits with snaffle mouthpieces are NOT snaffles. (Please see this article on Snaffle Basics if you need more clarification on what is and is not a snaffle bit.) Now, in Stage 1, I said that any standard set of reins would do. That is, to a point, true here as well. However, I find it much easier to use a connected set of reins as opposed to split reins. So, that would be English, dressage, or barrel reins. If all you have is split reins, I recommend you rubberband them together, so they function as connected reins. DO NOT use any draw reins, martingales, tie-downs, or other gadgets or gizmos.
Know Where to Stand for Long and Low
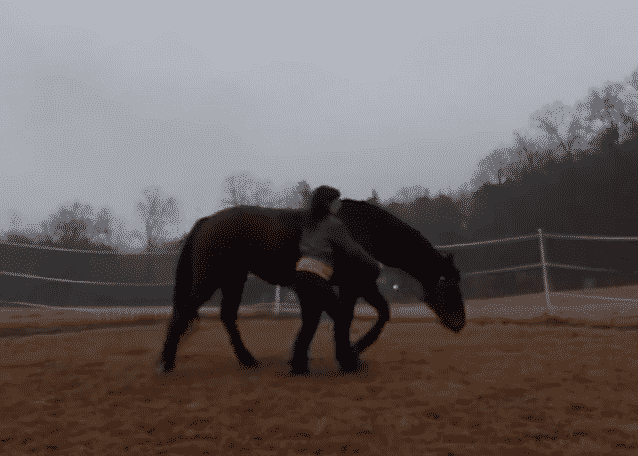
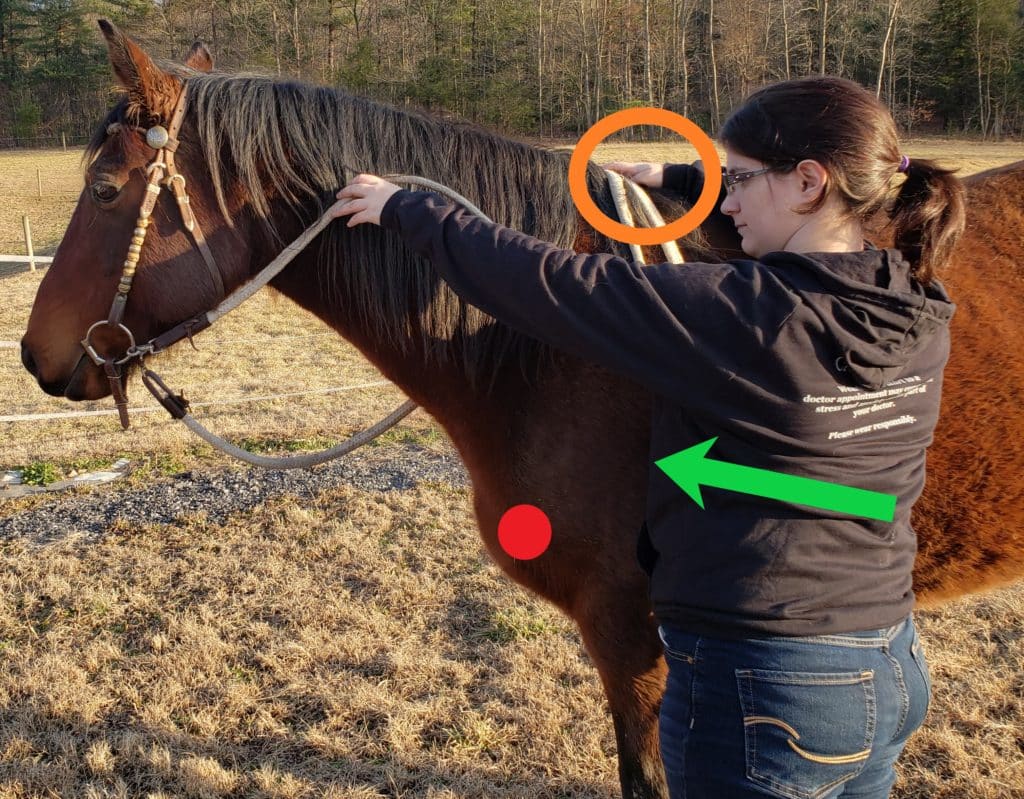
In Stage 2, we are going to still be working from the ground, but the horse will be in motion. You want to stand in a similar position to Stage 1, right behind the shoulder facing forward.
Exercise: Teaching Long and Low from the Ground
Step 1: Cue the horse forward onto a small circle
I recommend starting on whichever side your horse softens to the bit better on. For the sake of this example, we’ll say you are starting on the left side as in Figure A above. Rather than bringing your outside (left) arm up to ask the horse to soften to the bit, bring your arm forward and slightly down to cue the horse forward as demonstrated in the demo video below. Establish a steady walk, maintaining your position just behind the horse’s shoulder.
Step 2: Ask the horse to soften to the inside rein
This is where we apply the cue from Stage 1. Take up light contact with the inside rein and gently vibrate the rein against the ring of the bit to ask the horse to soften to the bit. Only do this on the inside rein. The horse should give you the same cues as Stage 1 when he softens to the bit (licking and chewing or yawning). However, when doing this exercise in motion, the horse’s head should begin to drop as he walks and relaxes into the stretch.
Step 3: Take up light contact with the outside rein and encourage the horse to stretch into the contact
When your horse softens to the bit and begins to lower his head, you should then take up very light contact with the outside rein and let the reins lengthen so the horse can stretch down as far as he is comfortable. If he starts bringing his head back up, follow him back up with the reins but lightly ask him to soften to the bit again to encourage him to stretch down.
Walking in the stretch like this is rather difficult for a horse who has never done it before. Therefore, you really shouldn’t spend too long doing this the first time or so. Get him it stretch down for a few strides on each side then move on to something else. This is great for building topline, but it takes time. Gradually increase the amount of time you ask your horse to stay in the stretch as your horse becomes more comfortable with the exercise.
Do not rush this. Do not feel bad if you can’t get your horse to stretch down as low as I have Moose stretching in the demo. This isn’t her first time doing this. Some horses will pick it up quicker than others, so patience is key.
Video Demo
Well, I keep getting requests to include videos with these training tutorials, so here it is. I had to film in a light drizzle, so sorry if it’s not always in perfect focus.
Video Critique: Long and Low Demo
1. Use more outside rein
As Moose improves (and I’m not distracted by trying to stay in frame), I can focus on taking up more contact with the outside rein. Many horses can have this problem at first. I had gotten Moose much better about it, but she’s been off work for a while due to my health issues and a second surgery on her eye, so she needs more practice taking up contact again.
2. Stop rooting at the bit
Moose has a nasty habit of rooting at the bit and trying to snatch grass. This exercise is much easier to do in a dirt arena where you don’t have the temptation of grass to contend with, but I don’t have one of those, so we make do.
Troubleshooting
1. The horse keeps rooting at the bit
If you’ve got the same problem I’m having with Moose, there is no easy fix. In her case, most of her rooting at the bit is trying to get at grass. There are a few things I do to mitigate this. First, I use the bit to set a wall that she isn’t allowed past. This means that her head can only go so low because I know if she gets that low, she’s not actually stretching, she’s just root and avoiding the exercise. If she tries to go lower than my set point, I just won’t let the reins out any further. However, I also have to be careful not to make her scared of taking contact with the bit, so I make absolutely sure that the only place she runs into resistance from the bit, is when she roots at grass. When she’s stretching, I am very careful to keep very soft contact with a lot of give. This can lead to the outside rein getting little too long at times (as you can see in the video), but I would rather have the outside rein be a little too long than have her spooked from me taking too solid of contact.
2. My horse won’t lower his head when he softens to the bit
Rather than holding the rein up when you ask him to soften to the bit, you may need to drop your hand below the level of the bit to encourage him to soften downwards. Most horses will get it after a few tries. But remember, it will be harder for some horses than others, especially those that have a lot of muscle built up on the underside of their neck. Be patient. Ask for baby steps. Rome wasn’t built in a day.


Long and Low is the way to go.. However the methodology in this blog is total nonsense.