
Neck reining is one of the most misunderstood arts in horse riding, second only to collection. The very name itself is misleading enough to make you wonder who on earth even came up with it in the first place. To understand the intricacies of training this art, we must first answer one vital question:
What is neck reining?
A common misconception about neck reining is that all you have to do is lay the rein against the horse’s neck to make it turn. Granted, you can teach a horse to do that. However, that method takes far longer to teach and is far less reliable. For the sake of simplicity we will call that method type 2 neck reining. Type 1 neck reining is the performance horse neck reining that is so often misunderstood and confused with it’s aforementioned counterpart.
The truth is, neck reining–at least, efficient type 1 neck reining–really has very little to do with the neck or the reins. Laying the rein against the neck only serves to backup the seat cues that tell the horse to turn. Yes, you read that right, you are actually steering with your seat. It really should be called seat steering, but that doesn’t sound fancy enough so let’s just stick with neck reining.
Type 1 Neck Reining
Type 1 neck reining is a far more reliable form of neck reining that takes far less time for the horse to learn. That being said, it takes a great deal more finesse and attention to detail for the rider.
This type of neck reining really shouldn’t be called neck reining at all. The rider’s seat is doing 99% of the work. The “neck reining” part only serves to reinforce the cues from the rider’s seat. A rider on a horse trained in type 1 neck reining should be able to drop the reins at any moment and still maintain the ability to steer the horse.
Training Type 1 Neck Reining
Training type 1 neck reining is generally more about training the rider than about training the horse. Once the rider is trained, the horse just needs practice. It’s all about body position. Remember, horses are lazy creatures at heart. Master the body position and the horse will naturally go where you want him to.
Prerequisites
- walking on a loose rein (If you have trouble with that, read up on classical lunging and teaching your horse to take responsibility for his own feet)
- riding in a snaffle bit, preferably in a smooth dog bone or mullen mouth (read more on choosing bit mouth pieces and western snaffle bits)
Equipment
You really need a good quality pair of reins. If using leather split reins, I prefer something with weight. Heavy herman oak leather split reins, or thick cotton split reins are my preference if you want traditional split reins. They have nice weight to them and are easier for the horse to feel. However, my number one choice would be rawhide romal reins. A good pair generally runs several hundred dollars, so for training I use a cheap $50 pair off of eBay. They have nice weight to them and the rawhide knots give fantastic feel against the horse’s neck. Yes, they are normally used with spoon bits and spades, but I also use them with other bits for training neck reining. That being said, romals are not very conducive to direct reining. So, they would not be a good choice for step 2 and–for some horses–step 3.
Step 1: Understand the Mechanics
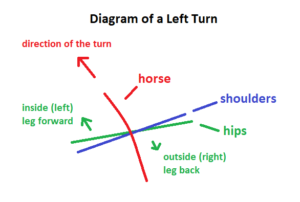
In Figure A below, you will see a diagram of a left turn. Red is the horse, blue is the rider’s shoulders, and green is the rider’s hips. Remember, the horse’s shoulders go where the rider’s shoulders go. Therefore, the riders shoulders stay square with the horse throughout the entire turn, no matter what their hips are doing. Going into a left turn, the rider’s inside (left) leg come slightly forward and the outside (right) leg moves slightly backwards. This offsets the hips from the shoulders as demonstrated below in Figure A.
Common Misunderstandings of the Mechanics
I’ve heard seasoned instructors say to put the inside leg back and the outside leg forward. At first glance, this seems logical. Moving the inside leg out of the way and pushing the horse in the direction you want him to go. However, there is an inherent flaw in this logic. When a horse turns his shoulder he naturally falls to the inside. This is only exaggerated with a rider on his back. Using the outside leg to push him over exaggerates this even more, causing him to fall on his front end, lose hind end engagement, and lose collection. This is why you put the inside leg forward. The inside leg holds the shoulder up through the turn. The outside leg goes back to encourage bend and engage the hind end. Your shoulders are what guide the horse through the turn. Remember, the horse’s shoulders follow the rider’s shoulders. Guide the horse through the turn with your shoulders, keep his inside shoulder up with your inside leg, maintain bend and hind end engagement with the outside leg.
Step 2: Practice body alignment
Put your horse on a loose rein. Lay your hand on the saddle horn–or pommel of the saddle if you are in an English saddle–to avoid the temptation of taking up the reins. Now, practice implementing the body position described above to turn without using the reins. It will take some time, so don’t get frustrated. Your horse will tell you when you get it right. Only ask for one or two turns the first time. Make those turn big gradual circles. Some horses might offer really sharp turns, so be prepared. If that happens, you’ve got a sensitive horse. That can be both a blessing and a curse. On one hand, it will take a lot less time for the horse to pick up on the neck reining and you probably won’t need to reinforce your cues with the reins. On the other hand, you will always have to be very mindful of your body position, otherwise you may find yourself turning when you didn’t intend to.
Step 3: Ask for Sharper Turns
If your horse is only giving wide, looping turns, start asking for gradually sharper turns. This is where reins may come back into play.
The Protégé
If you have a sensitive horse that takes to neck reining very quickly, this is where you can introduce romal reins if you choose. They increase the riders feel and sharpen the horse’s response. Just be ready for sharp turn. You may find yourself having to practice toning down your cues to ask for wider turns rather than the other way around. The ultimate goal is to be able to master the spiral exercise and maybe even turn the spiral into a spin.
The Lazy Horse
This is the horse that doesn’t want to do more than absolutely necessary. You want to keep this horse in a heavy pair of split reins that give a lot of feel but are conducive to direct reining if he needs a little nudge in the right direction. Bear in mind though, direct reining should only be a last resort. Try to nudge him along with your seat. A horse will naturally want to move with the rider. It is uncomfortable for him to be out of sync with you. A horse that is poking along slower than a snail isn’t going to have the motivation to make nice, tight turns. So, speed up your seat. Don’t overdo it. Just speed up your seat gradually. It won’t take him long to catch up with you. Once you establish a nice steady walk, he will start making tighter turns. The key is practice. Every once an a while you may need to tweak him with the inside rein to nudge him to turn a little sharper, but he should catch on pretty fast.
Common Mistakes
1. Rushing
Don’t put yourself on a time limit. It will take you some time to perfect the body position. Patience is key.
2. Bringing the the reins over the center line of the neck
Imagine there is a line that goes down the center of the horse from the tip of his nose all the way to his tail. This is the center line of the horse. No matter what type of reins you use, your rein hand should never cross that center line. If it does, you risk pulling on the outside rein and tipping his nose to the outside.
Type 2 Neck Reining
Type 2 neck reining is what some people think of as “traditional” neck reining. This is the method that involves simply placing the rein against the horse’s neck to cue the turn. In this case, laying the rein against the left side of the neck cues a right turn and laying the rein against the right side of the neck cues a left turn.
Training Type 2 Neck Reining
The training process for type 2 neck reining is quite simple, though it takes quite a bit of repetition.
Step 1: Direct Reining
Direct Reining is quite simple and is one of the first things any horse should learn under saddle. This is done in a snaffle bit, preferably in a smooth dog bone or mullen mouth. (Read more on choosing bit mouth pieces and western snaffle bits.)
If you want to turn right, just pick up on the right rein adding a few ounces of pressure. Tip the horse’s nose to the right until he turns. Repeat for a left turn. Never yank or pull. Expecting lightness creates lightness. If you automatically assume he’s going to fight, he will not disappoint you and you will find yourself in a pulling match that you have no chance of winning.
Step 2: Neck Reining
One you’ve got direct reining down, all you do for a right turn is lay the left rein against the horse’s neck before you pick up the right rein (direct rein) to cue the turn. Do that a few thousand times in both directions and he will eventually start responding to the neck reining before you apply the direct rein.
That’s pretty much all there is to type 2 neck reining. It takes forever and is far less reliable in the long term.
Common Mistakes
1. Rushing
Types 2 neck reining can take months depending on how many times a week you ride. It is easy to get frustrated and give up as it seems like there is little to no progress from day to day. This is the ultimate test of patience.
2. Bringing the the reins over the center line of the neck
Just like type 1 neck reining, your rein hand should never cross that center line. If it does, you risk pulling on the outside rein and tipping his nose to the outside.
3. Pulling too hard on the direct rein
You are just trying to tip the horse nose to the inside, not crank his head around. Put down those natural horsemanship DVDs and stop cranking on your horse unless you want him to have a rubber neck and hollow back for the rest of his life.


