
Lunging with side reins is the next step of the process for creating relaxation. Lunging is a commonly misunderstood exercise. It is often viewed as a way to run the energy out of the horse. However, this is extremely counterproductive. The more you lunge the horse, the fitter the horse gets. Therefore, it will take longer to run the horse’s energy out each time you lunge him. It is far more efficient to teach the horse to associate work with relaxation. This way, the horse will stay calm and be able to exercise self-control.
Prerequisites for Lunging with Side Reins
- Mastery of Creating Relaxation Stage 1: Releasing the Jaw
- Mastery of Creating Relaxation Stage 2: Long and Low
Required Materials
- Bridle with snaffle bit
- Lunge line
- Lunge whip (optional)
- Surcingle
- Saddle
- Side reins
Training Exercise: Lunging with Side Reins
Overview
Lunging with side reins builds on the foundation we built in the two previous exercises in this series–releasing the jaw and long and low. In Stage 1: Releasing the Jaw, we established a cue for the horse to soften to the bit with only the slightest pressure. In Stage 2: Long and Low we took that cue and applied it while the horse was moving, using it to lower the horse’s head and stretch down into the bridle. Now, in Stage 3, we’ll take those same concepts and apply them to lunging. This is where we will begin to introduce the horse to the concept of contact with the bit. This is not just an exercise for dressage. Horses in all disciplines greatly benefit from learning to soften to the bit and accept contact, even if you do not intend to ride in contact all the time.
Adjust the Side Reins Properly
It’s vital that you do not adjust the side reins too short in this exercise. We’re not trying to force the horse into a frame. This is about softening the horse to the bit and encouraging the horse to do what we want. You cannot force softness. The horse has to choose to relax. All we can do is provide guidance and encouragement for the horse and set him up for success.
When adjusting the side reins, leave enough room that the horse can stretch down and come in front of the verticle if he wants to. Don’t try to adjust them short enough so as to force him onto the verticle as this will actually cause most horses to duck behind the verticle. We’re not worried about frame or “pretty” head carriage. It’s a gymnastic exercise designed to build topline and create relaxation. Any frame that results from this exercise is voluntary on the horse’s part.
Know Where to Stand
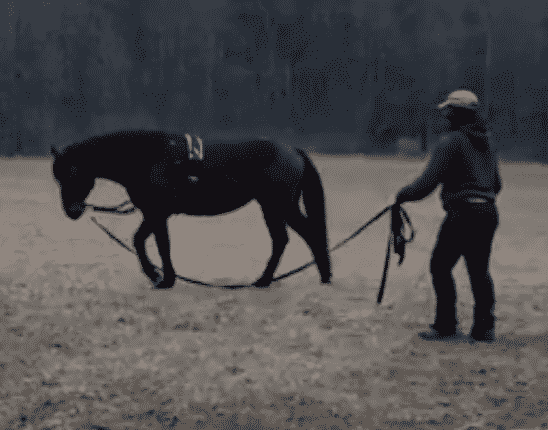
It’s important to stay behind the horse’s shoulder when lunging. This drives the horse forward and keeps him moving out on the circle. If the horse is circling to the left, hold the lunge line in your left hand and vise versa. If you are using a lunge whip, hold it in the opposite hand that you are holding the lunge line in. The lunge line should be connected to the inside ring of the snaffle.
Exercise: Teaching a Horse to Lunge with Side Reins
Step 1: Establish the Circle
Some horses work best when the handler stands stationary in the middle of the circle and the horse is let out on a long line to form a circle around this stationary point. However, my preferred method is putting the horse on a shorter line and walking a small circle of my own. This puts me closer to the horse and allows me to more easily influence his movement. The trick is, you need to be able to walk an accurate circle or your horse won’t walk an accurate circle. Either way is acceptable. Do what works best for you and your horse.
When you first start the exercise for the first time, don’t worry too much about how your horse is moving. Focus on establishing a uniform circle and a consistent walk. This can take a few sessions for some horses or only a few minutes for others. Once you have both of these down, you can start worrying about the finer details.
Step 2: Soften to the Inside Rein
This is why I prefer to lunge off the bridle. This step is not possible if you are lunging off a cavesson or halter. Your lunge line attaches to the inside ring of the bit. This allows you to gently vibrate the rein just like you did in Stages 1 and 2. If you’ve done your homework, vibrating the inside rein encourages the horse to relax the jaw, stretch the contact, and activate the topline. Most horses pick this up very quickly.
Step 3: Encourage the Horse to Track Up
Tracking up, quite simply, is the hindfoot landing in the hoofprint of the corresponding front foot. It takes some practice to see. Some horses find this harder than others. It really depends on their conformation. If your horse finds this difficult, don’t try to fix it all in one session. Some horses take a few months of consistent work before they can get close to fully tracking up.
The best way to encourage your horse to track up is to drive him forward in the walk. As long as the horse stays relaxed, this will get him to use his hind end and reach up under himself more. Be careful not to overdo it though. You don’t want his head shooting up and making him go hollow. If this happens, let him slow back down to a pace he is comfortable with until he relaxes and try again, just with a little less energy this time. It’s all about baby steps.
Step 4: Swap the Surcingle out for a Saddle
Once the horse is softening to the inside rein, stretching down into the contact, and tracking up properly, it’s time to swap the surcingle out for a saddle. This allows the horse to associate his newfound calmness and relaxation with a saddle. For hotter, higher strung horses, the saddle is often associated with anxiety and stress. Using these techniques, we can overwrite those associations and begin to build better habits so that when you actually do get back in the saddle, the horse maintains his new calm and relaxed mindset.
Video Demo: Lunging with Side Reins
Tips for Success
1. Make sure you have a solid foundation
If your horse pulls too much on the lunge line to be safely lunged off the bridle, he needs to spend more time in stages 1 and 2 before moving on to stage 3.
2. Your horse can’t relax if you aren’t relaxed
Our horses feed off of our energy. If you are tense, your horse will be tense.
3. Take your time
Like the old cliche says, Rome wasn’t built in a day. Look for incremental improvements in each session. Take it at your horse’s pace. In this case, slower really is faster.
Common Horse Mistakes
Turning to the Inside When You Vibrate the Rein
At first, you may need to use the lunge whip to cue the horse to stay out on the circle while you vibrate the inside rein. This is normal.
Ignoring the Inside Rein
If you are having problems getting your horse to soften to the rein, it probably means there are holes somewhere in your foundation. Take a step back


Total nonsense.